A front door protects more than a home’s entrance. It supports security, comfort, privacy, and everyday convenience. In 2026, buyers should understand common front door repair types before choosing a contractor or approving a quote. Small faults can reveal larger problems. A loose hinge may cause rubbing, while a cracked frame can affect alignment and security.
This guide examines practical repair categories found in modern homes. They include lock replacement, hinge adjustment, frame repair, weatherstrip renewal, glass replacement, threshold correction, and smart lock servicing. Each issue needs a different skill level, material, and inspection process. A qualified technician should check the door slab, frame, hardware, and surrounding wall before recommending work. Manufacturer instructions and local building guidance also deserve attention.
Real repair decisions are rarely perfect. A worn seal may look minor, but moisture can already be reaching the subfloor. A new lock may improve control, yet it cannot correct a badly warped door. Buyers should ask for clear photographs, itemized pricing, warranty terms, and evidence of relevant experience. That simple habit can prevent rushed choices.
Details matter.
This overview uses practical observations and professional repair principles to explain what buyers may encounter. It also highlights warning signs that deserve further inspection. Some recommendations may change with the door’s age, material, climate, and installation quality. That uncertainty should be acknowledged, not hidden. With careful evaluation, front door repair becomes easier to compare, budget, and plan.
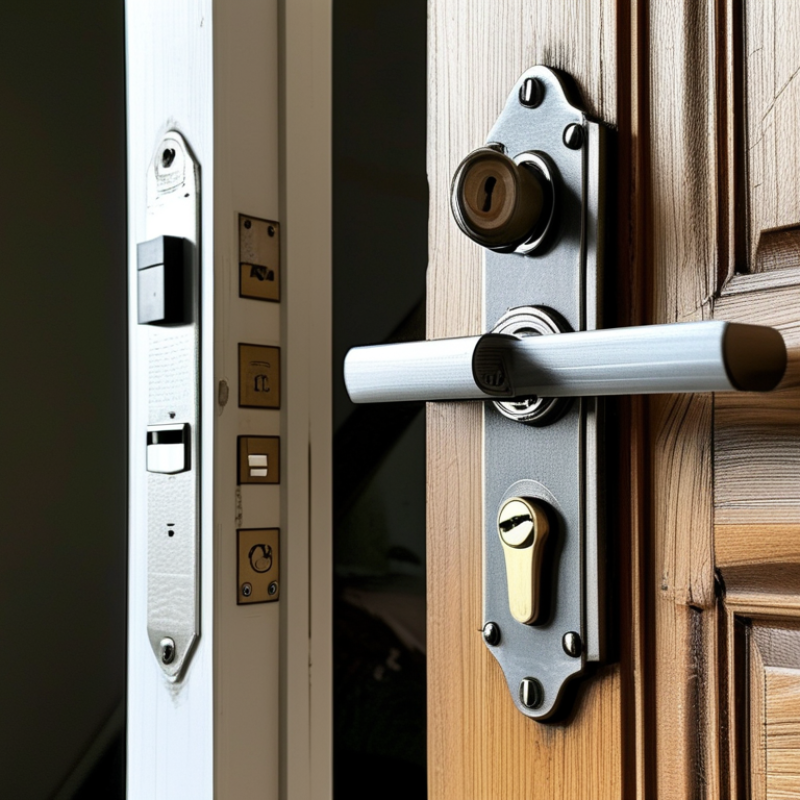
A sticking front door often points to hinge wear, frame movement, or seasonal swelling. Check for scraping near the lower corner. Uneven gaps around the slab also deserve attention. Loose hinges may create a slight drop and a sharp clicking sound. That sound matters. A qualified technician should inspect the screws, hinge plates, and frame alignment before replacing the entire door.
Lock problems are another common repair type. A key that turns roughly may indicate a worn cylinder or misaligned latch. If the handle feels loose, internal parts may be failing. Never force the key. Forced entry can damage the lock and surrounding wood. I have seen owners replace a lock when the real issue was a shifted strike plate.
Drafts, water marks, and daylight around the edges suggest damaged weatherstripping or a worn threshold. Soft wood near the sill can signal moisture damage, especially after repeated rain. Fogged insulated glass usually indicates a failed seal, not simple surface dirt. Door closers may also leak oil or slam unexpectedly. These details help buyers estimate repair costs during an inspection. Still, visual checks are imperfect. Hidden damage behind trim can remain unnoticed without careful testing. A small flashlight, gentle pressure test, and moisture reading can reveal more than a quick glance.
Choosing the right front door repair starts with the symptom, not the part that looks damaged. If the door scrapes the floor, check loose hinges, a shifted frame, or swollen wood. Tightening screws may help, but it will not correct a twisted frame. A gap along the top often points to sagging, while uneven side gaps suggest poor alignment. I inspect the reveals, hinges, threshold, and frame before recommending work.
A sticking key usually needs attention around the lock cylinder, not more force. If the latch misses the strike plate, adjustment or door realignment may solve the problem. A loose handle needs secure fasteners, while a failing closer may require controlled tension adjustment. Small changes matter. I once blamed a lock for a door that had actually dropped several millimeters.
Cold air around the edges usually means worn weatherstripping or an uneven threshold. Water marks near the bottom can indicate failed sealing, poor drainage, or hidden wood rot. Soft wood may accept a patch, but deep decay often requires partial frame replacement. Cracked glass needs careful replacement with suitable safety glazing. Peeling paint should be removed only after finding the moisture source. Photographing each defect helps document the repair decision. When the frame shifts, the door binds severely, or damage extends behind the trim, an experienced door technician should inspect it before further adjustment.
| Repair Type | Common Signs | Likely Cause | Recommended Repair | Priority | Typical Service Time | Buyer Inspection Tip |
|---|---|---|---|---|---|---|
| Door Alignment | The door rubs against the frame, leaves uneven gaps, or does not latch smoothly. | Loose hinges, a shifted frame, building movement, or a sagging door slab. | Tighten or replace hinge screws, shim the hinges, and adjust the strike plate or frame. | Medium | 1–3 hours | Open and close the door several times and check whether the reveal is consistent on all sides. |
| Hinge Repair or Replacement | Squeaking, visible rust, loose hinges, or a door that drops when opened. | Worn hinge pins, stripped screw holes, corrosion, or undersized hinges. | Lubricate, replace hinge pins, install longer structural screws, or fit new hinges of the correct size. | Medium | 30 minutes–2 hours | Lift the handle gently while the door is closed; noticeable vertical movement can indicate hinge wear. |
| Lockset or Deadbolt Repair | The key sticks, the thumb turn is difficult to operate, or the deadbolt fails to extend fully. | Misalignment, worn internal parts, damaged keys, or debris inside the cylinder. | Realign the strike, lubricate with a suitable lock lubricant, rekey, or replace the lock mechanism. | High | 30 minutes–2 hours | Test the lock with the door open and closed; a lock that works only when open usually indicates alignment trouble. |
| Strike Plate Adjustment | The latch misses the opening, requires force, or does not hold the door securely. | Door settling, a loose plate, or incorrect positioning of the latch opening. | Reposition the plate, enlarge the opening carefully, and secure it with appropriately sized screws. | Medium | 30 minutes–1.5 hours | Look for fresh screw holes, chipped wood, or metal marks around the latch opening. |
| Weatherstripping Replacement | Visible daylight, drafts, outside noise, dust, or water entering around the edges. | Compressed, cracked, missing, or incorrectly installed sealing material. | Remove damaged seals and install a compatible compression, kerf, adhesive, or surface-mounted seal. | Medium | 1–3 hours | Inspect the full perimeter, especially the lower corners and hinge side, where gaps are often missed. |
| Door Sweep Replacement | A draft or light is visible beneath the door, or water and insects enter at the threshold. | A worn sweep, incorrect height, or an uneven threshold. | Replace or adjust the sweep and verify that it contacts the threshold without excessive friction. | Medium | 30 minutes–1.5 hours | Place a sheet of paper under the closed door; moderate resistance when pulling it out indicates contact. |
| Threshold Repair or Replacement | The threshold is cracked, loose, soft, uneven, or allows water to collect inside. | Moisture damage, failed sealant, settlement, or impact. | Reseal, refasten, level, or replace the threshold and correct the underlying drainage issue. | High | 2–6 hours | Press gently near the corners; softness or movement can signal hidden moisture damage. |
| Door Closer Adjustment | The door slams, closes too slowly, fails to latch, or will not close completely. | Incorrect hydraulic adjustment, a leaking closer, wind pressure, or frame misalignment. | Adjust closing and latching speed; replace the closer if hydraulic fluid is leaking or the arm is damaged. | Medium | 30 minutes–1.5 hours | Observe the final closing movement and check for oil around the closer body or arm. |
| Glass Panel Repair | Cracks, broken panes, fogging between insulated glass layers, or loose glazing. | Impact, thermal stress, seal failure, or movement of the door panel. | Replace the glass unit or pane with matching dimensions, safety characteristics, and glazing components. | High | 2–6 hours, excluding custom fabrication | Do not touch cracked or shattered glass; check whether the panel is marked as safety glazing where applicable. |
| Frame or Jamb Repair | The frame is split, bowed, loose, or shows gaps and water staining. | Moisture intrusion, impact, settlement, or inadequate fastening. | Repair localized damage, reinforce the jamb, replace deteriorated sections, and restore exterior flashing or sealant. | High | 4 hours–2 days | Inspect both sides of the jamb and the trim for swelling, soft wood, staining, and separation from the wall. |
| Rot or Moisture-Damage Repair | Soft wood, peeling finish, discoloration, musty odor, or recurring swelling near the bottom edge. | Persistent leaks, poor drainage, failed sealant, or unsealed end grain. | Remove unsound material, repair or replace affected components, dry the area, and correct water entry before refinishing. | High | 1–3 days | Use a visual check and a gentle probe on painted wood; do not cover suspected rot without finding the moisture source. |
| Surface, Paint, or Finish Repair | Peeling paint, faded coating, scratches, dents, or exposed unfinished material. | Sun exposure, moisture, impact, poor surface preparation, or normal wear. | Clean, sand, fill minor damage, prime exposed areas, and apply a suitable exterior-grade finish. | Low to Medium | 4 hours–2 days, including drying time | Separate cosmetic wear from structural damage by checking whether the door remains rigid and properly aligned. |
| Door Slab Repair or Replacement | The slab is severely warped, split, swollen, or no longer supports hardware securely. | Long-term moisture exposure, impact, structural failure, or extensive material deterioration. | Repair localized damage when structurally feasible; otherwise replace the slab and transfer or refit compatible hardware. | High | 4 hours–2 days, excluding custom fabrication | Check the slab for twisting and compare the top, middle, and bottom gaps before deciding between repair and replacement. |
Service times are general on-site estimates for a standard residential front door and may increase when concealed damage, custom glass, structural movement, or extensive moisture intrusion is found.
A sound front door repair starts with diagnosis, not guesswork. Check the hinge screws, frame alignment, latch movement, and daylight around the seal. Useful tools include a tape measure, level, screwdriver, drill, utility knife, pry bar, clamps, and safety glasses. Common materials include longer corrosion-resistant screws, wood shims, replacement weatherstripping, a door sweep, backer rod, and exterior-grade sealant. A small level matters. Even a few millimeters can cause rubbing.
The required skill depends on the fault. Hinge replacement needs accurate pilot holes and controlled tightening. Frame adjustment requires patience, careful shimming, and repeated testing. Seal replacement needs clean surfaces and steady pressure. The U.S. Department of Energy identifies door and window leakage as a significant source of household energy loss, so sealing gaps can improve comfort. However, do not confuse sealing with structural repair. The 2024 Cost vs. Value Report from Zonda reported a 188.1% average cost recoup for steel entry-door replacement. That figure reflects replacement, not every repair project, and local conditions vary.
Tips: Photograph the hinge positions before removal. Test the latch with the door open first. Leave a small clearance beneath the sweep. I still recheck alignment after tightening, because frames can shift slightly. Replace damaged framing instead of forcing new screws into soft wood. If the door is heavy, glazed, or badly distorted, get an experienced technician; one-person repairs can create unsafe strain.
In 2026, front-door repair should begin with diagnosis, not replacement. Check the reveal around the slab with a ruler. Uneven gaps often indicate loose hinges, frame movement, or foundation settling. Tighten each hinge screw, then replace stripped screws with longer structural screws. If the hole spins freely, insert a hardwood plug and redrill it. Small details matter.
A sagging door may still scrape after hinge work. Mark the contact point, loosen the hinge slightly, and add a thin shim behind it. Next, test the latch with the door closed. The bolt should enter the strike plate without force. Realign the plate in small increments. Avoid removing excessive wood. That mistake weakens the frame. Replace worn weatherstripping by measuring the jamb, cutting clean corners, and pressing the seal firmly into its channel. The U.S. Department of Energy reports that air leakage can represent 25–40% of heating and cooling energy use, so this simple repair deserves attention.
Inspect the threshold for soft wood, moisture stains, and daylight. A damaged threshold may need replacement rather than caulking. The 2024 Cost vs. Value report shows strong buyer interest in entry-door upgrades, but repair quality still affects perceived value. Cracked glass, fire-rated assemblies, or badly twisted frames require qualified inspection. My practical warning is simple: a door can look aligned while failing to latch securely. Test it repeatedly, including after temperature changes.
A front door can look tired without being structurally damaged. Common repair types include hinge replacement, lock adjustment, threshold repair, weatherstripping, glass-seal replacement, and minor frame correction. If the slab closes evenly and the frame remains square, repair is usually practical. The U.S. Department of Energy identifies uncontrolled air leakage as a major source of household energy loss, so a visible draft deserves attention, even when the door appears attractive.
Replacement becomes more sensible when the door has rot, deep warping, repeated water damage, or a cracked frame. Security concerns also matter. A weak jamb or loose hinges can reduce protection, regardless of the door’s style. The 2024 Cost vs. Value Report from Zonda reported an average 188.1% cost recoup for a steel entry-door replacement, based on national resale estimates. That figure is useful, but it is not a promise. Local labor, material prices, and installation quality can change the result sharply.
Buyers should inspect the bottom corners, hinge screws, sill, and weather seal. Open the door halfway. It should stay in position, not swing or drift. Listen for scraping. Check daylight around the edges. A repair estimate should separate cosmetic work from structural work. This distinction is easy to miss. Sometimes replacing damaged trim solves the draft, while replacing the entire door only increases cost. Still, an old door with several small failures may become the expensive choice over time. A careful inspection is worth more than a quick visual judgment.